| |
The
Story of Sculpture: From Clay to Bronze
| Introduction:
The Art of the Lost-Wax Process
The earliest known “lost-wax” castings date from the
early dynasties of Egypt, nearly 7,000 years ago, when metal was
poured into “investments” of fired clay that had been
shaped with the help of wax that was melted, or “lost”.
Then, sometime between 4,000 and 3,000 B.C., bronze was discovered,
probably by accident, as being a metal that was harder than copper
or tin alone. Thus began the era known as the Bronze Age.
Ancient “lost-wax” bronze castings have withstood the
centuries, visually telling the tale of past cultures, their religions,
and their social structures. For example, Chinese bronzes depicted
ceremonial images; Indian and Egyptian castings symbolized deities;
Africans cast images of nature; and the Greeks recreated the human
form.
|
|
 |
|
Many of these cultures have since grown obsolete, their religions
have evolved and societies have changed. Elements of the “lost-wax”
process have been refined. Yet today, bronze casting is essentially
the same as it was in 2,000 B.C. during the Akkadian period.
Bronze is an alloy of 95% copper, 4% silicon and 1% manganese with
traces of other elements such as iron. Silicon bronze has been the
bronze of choice for fine art castings since its development in
the 1920s. It is corrosion-resistant, strong, resilient, formable
and weldable. Also known as "hot-cast" bronze, a fine
art "lost-wax" casting of silicon bronze is created through
many labor-intensive steps.
|
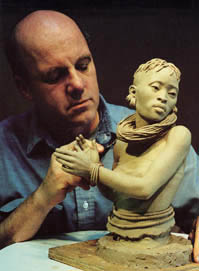
Sculptor
Tuck Langland works on
the clay for his sculpture "Kenyan Dancer". |
|
1.
Making the Original Clay Sculpture
To begin the process of making a bronze sculpture, most
sculptors choose to make an original out of clay. There are multitudes
of different clays available for the sculptor. The three main categories
of clay used for sculpture are water-based clay, oil-based clay,
and self-hardening/low-fire clay. Choosing the proper clay for a
particular project may simply be a matter of preference. Experience,
however, is perhaps the best teacher when deciding what type of
clay to use.
Most of the artists with Sculptureworks prefer to work with oil-based
clay (also known as plasticene, plastilene, or plastilina). The
main reason for working with oil-based clay is because it never
dries or hardens. It can always be softened and reworked if a change
needs to be made. The main concern with using oil-based clay is
how to have the clay soft enough to build the sculpture rapidly
and yet at the same time have the clay hard enough to produce good
detail. The usual solution is to choose a clay that is hard enough
for detail work and then just use heat to soften the clay for buildup.
Very
small sculptures are often modeled directly in wax which, though
more difficult to model, allows for maximum detail.
|
| 2.
The Use of Armatures
An armature in a sculpture is a material used for supporting
the weight of the clay. An armature is usually necessary when portraying
a figure in motion or in a standing posture. The armature serves
as the underlying support to the sculpture. In some cases, a skeletal
formation can be made out of wire, or other materials such as pipe
or aluminum, that will help hold the clay in place, so that the
clay can be worked and detailed.
When working with large sculptures, weight is an important issue.
Thus, after the initial armature is constructed, sculptors often
use “fillers” such as styrofoam or aluminum foil to
“fill out” the form and reduce the amount of clay being
used. If most of the mass of the armature can be made with filler,
then the clay on top will be just a thin skin instead of a huge
thick mass that risks falling off.
Once the armature is built, the clay sculpture can then be formed
around and on the armature. The armature holds the parts of the
sculpture in place, allowing the sculptor the freedom to move the
clay along the armature to get the form that he or she wants.
For bas reliefs, an armature can be constructed which consists of
a grid of screws connected with wires to prevent the clay from sliding.
|
|

Sculptor
Blair Buswell made this
larger-than-life armature to support his monumental sculpture of basketball
legend Oscar Robertson. Blair covered this steel armature with foam
before adding the clay. |
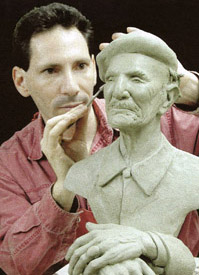
Sculptor
Paul Oestreicher
makes finishing touches to the clay version of his sculpture of painter
Alfred Levitt. |
|
3.
Finishing the Clay in Preparation for Molding
Once the final touches have been made to the original clay
sculpture, the final procedure before molding is touching up delicate
details and smoothing the surface of the clay to perfection. This
is quite important because any error or imperfection in the clay
would be copied in the molding process and would appear in every
subsequent stage. Thus, the smoother the clay, the less work will
be needed on the wax replica and the finished bronze casting itself.
Hook tools, or rake tools, are often used to cut the clay down to
a new contour and to leave small raised ridges on the surface. For
smoother surfaces, rubber or metal kidney tools can be used. For
really fine surfaces, a brush and a solvent are used to whisk away
all tool marks.
Once the desired smoothness has been achieved, the piece should
be allowed to dry thoroughly before continuing to the molding process.
|
| 4.
Making a Mold of the Clay Original
When the clay sculpture is completely smooth and finalized,
a mold must be made of the original clay. Excellent surface replication
of the original can be achieved with a polyurethane mold compound
or a high-quality silicon rubber.
The most common material used to produce a mold today is a material
known as Smooth On. It is a latex rubber that is very carefully
formulated to be able to pick up the minutest details in a work.
The rubber mixture is applied directly to the surface of the clay,
using a brush to actually “paint” it onto the surface.
Special attention needs to be given to avoidance of air bubbles
that may be trapped within the rubber mixture.
Once the first coat of rubber has been applied to the surface, it
must be allowed to thoroughly dry (usually for 24 hours) before
the next coat is applied. All of the details from the original clay
are now picked up within the rubber material that has been painted
on. A mold most generally consists of three to five coats of rubber
(applied over the course of several days).
Once the final coat of rubber has dried, a firm outer "jacket"
is made to help retain the shape of the more flexible rubber mold
for pouring the wax replica. This “jacket” is usually
made out of plaster, Hydrocal, resin, or epoxy, and is called the
“mother mold”.
When all of this is complete and it is all dry, the outer "jacket"
is removed, and the rubber is then cut away from the clay, on what
is called a parting line (simply the division line for the mold).
The sculpture has now gone from a positive form to a negative form.
If the sculpture is large or complex, it will usually have to be
divided into smaller pieces, with each piece needing its own individual
mold. The pieces will be rejoined later, after the sculpture is
cast in bronze, to make the complete sculpture whole again.
The learning process for making an excellent multiple piece rubber
mold can take years. A novice should hire a professional, or make
a plaster waste-mold of the original and make a plaster cast (a
positive). From this solid positive a rubber mold can be made without
risk of "losing" the original. The highest quality mold
will save much time and money in production.
|
|
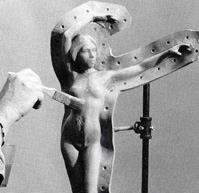
Above:
Sculptor Tuck Langland
applies the first coat of rubber by brush to make the mold of his
sculpture "Dawn". 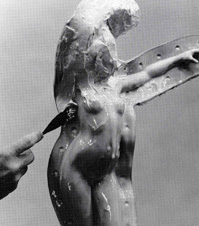
Above:
Sculptor Tuck Langland
applies the third coat of rubber by spatula. 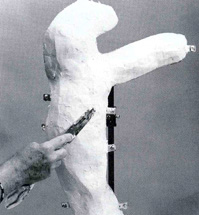
Above:
Sculptor Tuck Langland
applies the top plaster "jacket", or "mother mold",
to hold the form of the mold. |
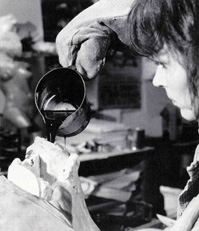
A
worker pours melted wax into the "mother mold" through a
hole in order to make a wax positive. |
|
5.
Pouring a Wax Replica From the Mold
With the “mother mold” complete, positive forms can
now be generated by pouring a wax replica. Pouring a wax is usually
done in four stages or coats. The first coat is applied by heating
the wax to a temperature of approximately 220 degrees Fahrenheit.
While the wax is quite hot, the mold is rotated about, in an attempt
to coat the entire internal surface of the mold with the melted
liquid wax, which is poured into the “mother mold” through
a hole. The second coat of wax is applied slightly cooler, at around
200 degrees. The final two coats go on at approximately 180 to 185
degrees.
A
completed wax should be approximately 1/4” thick, or just
slightly thinner. When the wax cools and the mold is removed, a
wax positive of the sculpture emerges.
If the sculpture is a bas relief, or if it has a large mold that
opens wide, it is usually much easier to brush on the wax. Following
the same temperature guidelines per coat as above, the wax must
be brushed on beginning in the deepest hollows of the mold to avoid
any drips.
|
| 6.
Wax Chasing
"Wax chasing" is the procedure of repairing all
of the imperfections that were created during the pouring process
of the wax to maintain the original details within the mold. There
will most always be a few air bubbles, seams, and mold lines which
will need to be removed from the surface of the wax positive.
"Wax chasing" is usually performed at the foundry by a
professional "wax chaser". However, if the sculptor prefers,
they can do the "wax chasing" themselves.
The "wax chasing" procedure is done with small, delicate
tools for scraping, and with a hot tool for filling in the imperfections
within the wax. Once the wax is back to a perfectly finished state,
the sculptor inspects the wax. If the wax receives the sculptor's
approval, it is ready to go to the foundry for spruing.
|
|
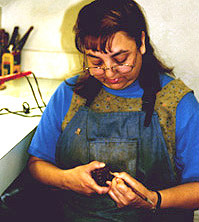
A
wax chaser at Schaefer Foundry in Arlington, TX, works on the wax
with small tools to remove any imperfections. Photograph by Elizabeth
Loggins. |
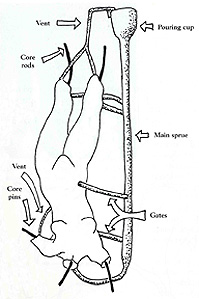
A
diagram of the sprue system by Sculptor Tuck
Langland. |
|
7.
Spruing a Wax
The finished wax is a positive replica of the original clay. A network
of wax rods, called sprues and gates, are next attached to the positive
wax model. These sprues will serve as a type of channel system,
which will feed the molten metal to all of the areas of the sculpture,
as well as allow gases and air to escape. Also, a wax funnel (called
a pouring cup) is attached to the gates for use during pouring.
|
|
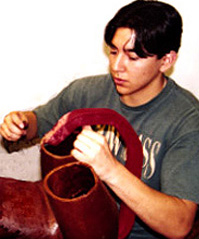
A
worker at Schaefer Foundry in Arlington, TX, attaches a sprue system
to a wax portion. Photograph by Elizabeth Loggins. |
During the spruing process, special care is given to areas such
as the tips of a rabbit ear, or the fingers of a frog, to ensure
that these fine areas will not “short pour”. Once the
spruing is completed, the wax is ready to go on to the shelling
process.
|
| 8.
Ceramic Shell (Investment Casting)
The ceramic shell process requires a series of dipping the wax positive
into a mixture called slurry to create a hard shell. This ceramic
shell, once dry, becomes a hard, durable shell around the entire
sculpture that is going to receive, hold, and shape the molten metal
to produce the bronze figure.
The wax is first dipped into a solvent, which cleans any loose particles
or debris from the surface of the wax. The shell process is about
to begin. The clean wax is dipped into a solution called prewet,
followed by two coats of a very fine grained slurry. This is known
as the primary coating. This is where all of the fine detailing
in the piece is picked up. It is almost like grained silicon flour.
The shell then progresses through the slurry process, into different
slurry mixtures, which are various grades, gradually becoming courser
with each coating. Each time the wax is coated with the ceramic
slurry mixture, it is allowed to dry thoroughly. Each coat adds
support to the overall strength of the shell. The ceramic shell
process consists of seven to nine coats of slurry mixture. Once
all of the coats have dried, the ceramic shell is then sent to be
“dewaxed”.
|
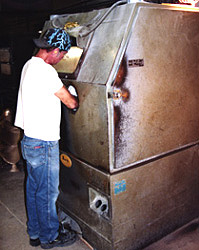
| 9.
Melting/Burning Out the Wax
When the ceramic shell is complete, it is placed in a high
pressure sealed oven, known as an autoclave. High temperatures (1500
to 1800 degrees Fahrenheit) and pressure force the wax from the
shell and the wax melts out, thus becoming "lost". This
is where the name “Lost-Wax Process” has been derived.
The wax has now left the shell, leaving the detailed impression
within the shell, which will soon become filled with the molten
bronze. This step also hardens the ceramic shell in order to prepare
the shell for the extreme temperature of the molten bronze which
it is about to receive.
|
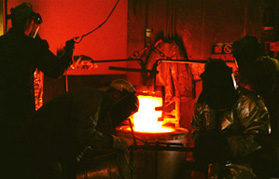
The
workers at Schaefer Foundry in Arlington, TX, carefully lift up the
crucible, containing the molten bronze, out of its heating furnace.
Photograph by Elizabeth Loggins. |
|
10.
Casting/Pouring the Bronze
When the ceramic shell is empty of wax, it is then re-fired and
made ready to have the molten bronze poured into it. All of the
hot ceramic shells are taken to the pouring floor, where they are
either placed in sand to stand by themselves, or they are wired
to a support frame to be held in place.
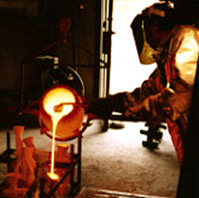
The solid blocks of bronze, meanwhile, are heated to a temperature
of approximately 2250 degrees Fahrenheit so that liquid bronze is
created. The liquid bronze is stirred and prepared for the pour.
|
| When
the molten bronze is ready, the foundry workers very carefully lift
the crucible, containing the liquid bronze, out of its heating furnace.
The workers must wear protective face shields, clothing, gloves,
and boots.
Moving quickly and very precisely, the foundry workers pour the
liquid bronze into each awaiting ceramic shell. When the ceramic
shells are all full with the poured bronze, they are then left to
cool for several hours. The negative space within the ceramic shells
have now become positive bronze castings.
|
|
Right:
A worker at Schaefer Foundry in Arlington, TX, pours the molten bronze
into ceramic shells. Photograph by Elizabeth Loggins.
|
|
|
Sculptor
Tuck Langland breaks
apart a cooled shell to separate the metal inside from the shell. |
|
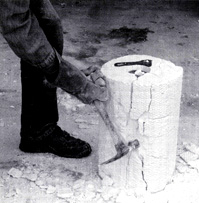
11.
Break Out
Once the bronze and ceramic shell has cooled, the ceramic
shell is broken off to separate the bronze metal from the shell.
This is done with hammers, tools, power tools, and sand blasters.
This process needs to be done very cautiously, though, in order
not to cause unwarranted damage to the metal surface. Once the entire
ceramic shell has been removed, the sprues (which have now become
metal) must also be cut away or sawed off.
At this stage, the uncovered bronze is considered a "raw metal".
|
| 12.
Metal Chasing
"Metal chasing" is the process of finishing the metal
back to the appearance of the original. This process usually involves
a fair amount of welding with a high frequency welder. Grinders
are often used to remove sprues. Angle grinders with a variety of
different grades of Roloc pads are used to finish the surface of
the bronze. Always start out with a courser pad and then work your
way down to a very fine pad when chasing the metal.
It may also be necessary to retexture some areas of the bronze.
This can be done with a tool known as a pencil grinder. This tool
uses a variety of high-speed burrs, some of which are quite similar
to those used by a dentist, to perfect the final bronze.
|
|
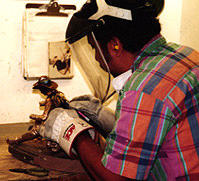
A
metal chaser at Schaefer Foundry in Arlington, TX, works on the metal
with small tools to remove any imperfections in the final bronze.
Photograph by Elizabeth Loggins. |
| 13.
Metal Welding/Assembly
If the sculpture being created was rather large or complicated,
it might have been cut into pieces during the mold stage. This is
necessary in order to be able to make molds that would be small
enough to pour bronze into evenly. That is, instead of one big mold
for a large piece, the piece may have been broken up into five or
ten different smaller pieces, each piece with its own mold. Each
smaller mold would thus be a different part of the whole sculpture,
so that when all of the pieces have been poured and chased, they
can then be fit back together to create the whole piece.
If this is the case, all of the separate bronze pieces must be welded
together to create the whole sculpture again. A metal welder will
use a high frequency welding torch to carefully weld the sculpture
together. After the sculpture is welded back to one piece, all of
the weld lines must also be chased away so that they disappear and
it looks as though the sculpture was all one piece to begin with.
|
|
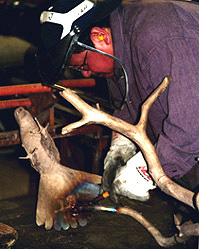
A
welder at Schaefer Foundry in Arlington, TX, carefully welds a bronze
bird to a branch. The bird's wings need to be added as well. Photograph
by Elizabeth Loggins. |
A
worker at Schaefer Foundry in Arlington, TX, uses the sand-blasting
cabinet. Photograph by Elizabeth Loggins. |
|
14.
Sand-Blasting the Bronze
When the final piece is all welded together and chased to perfection,
the bronze is next sand-blasted (or bead-blasted) to make it very
smooth and shiny. Using a sand-blast cabinet is the most convenient
way to sand-blast a sculpture. The sculpture is placed inside of
the cabinet and the lid is closed securely. A worker can insert
their arms into the cabinet through holes on the side of the cabinet
which have gloves attached to protect the worker's arms. Wearing
these protective gloves, the worker can then operate the sand-blasting
compressor while monitoring the progress through a window in the
cabinet.
After the sculpture is sand-blasted, the sculptor once again inspects
the piece for accuracy. Now that the bronze has been sand-blasted,
its true gold-like color, almost like glowing platinum, is visible.
The sand-blasting also makes the surface of the bronze more porous,
allowing the top surface to be more open to penetration of the patina
in the next stage.
|
| 15.
Patinazation
The "patina" is the color of the bronze. "Patinazation"
is the process whereby a calculated chemical reaction between bronze,
acidic chemicals, and high temperatures oxidize the surface of the
metals. Certain chemicals will produce certain predictable colors
when they are sprayed on the bronze and then heated up.
The patina process begins by heating (usually with a torch) the
surface of the bronze to a temperature of approximately 450 to 475
degrees Fahrenheit. The surface will have a nice golden appearance
when it is ready. A wide variety of techniques can then be used
for chemical application, the most common being done with natural
bristle brushes. Chemicals can also be applied with spatter guns,
spray bottles, and airbrushes.
|
|
J.D.
uses a blow torch to heat a bronze in preparation to apply the patina.
Photograph by Elizabeth Loggins. |
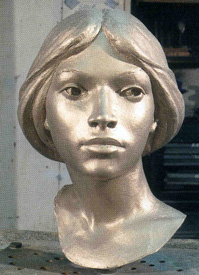
The
bare metal, before the patina is applied, of "Head of Dawn"
by Sculptor Tuck Langland.
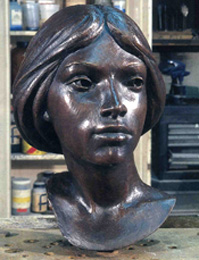
"Head
of Dawn" by Sculptor Tuck
Langland after the final patina is applied (with ferric nitrate
over liver of sulfur). |
|
The
chemicals applied to the bronze will interact with the metal, creating
a colored or textured appearance to the surface of the bronze. The
patina has become quite an art in itself, and many beautiful combinations
can be achieved.
Browns, golds, and reds are typically produced through the use of
Ferric Nitrate. Greens and blues can be produced with Cupric Nitrate.
Whites and beiges can be produced with Bismuth Nitrate and Zinc
Nitrate. Silver Nitrate is very expensive, but if applied very hot
and with persistence and expertise, it can create a beautiful silvery-gray
patina.
The ancient Asians would bury their bronzes to naturally oxidize
them, sometimes for years, in order to create patinas. Today, the
oxidation and coloring of bronze sculpture can take place within
a matter of hours. But it is still a delicate process that should
be performed with caution and with the proper equipment, preferably
by a trained patineur.
After
the patina is applied, the patineur and the sculptor decide between
two sealants to protect the patina. The traditional method of protection
is to apply several thin coats of clear paste wax to the surface,
which is then lightly buffed with a soft, clean, cotton cloth. This
patina should last indefinitely indoors. However, if people repeatedly
touch certain areas, the bronze may be expected to eventually shine
through.
Because today's outdoor atmosphere is more corrosive and carries
a higher content of manmade pollutants, a more durable lacquer,
metal protectant is recommended for any sculptures placed outdoors.
Incralac™ is one such sealant designed specifically for copper
and its alloys. Since Incralac™ produces a plastic-looking,
high-gloss finish, the sculpture must be waxed to create the soft
look of a traditional patina.
|
| 16.
Completion: The Finished Sculpture
After the completion of all of the above steps, a unique bronze
sculpture will have been produced and can now be sold. Of course,
if this piece sells and the sculptor wants to make another one,
that sculptor will then have to return to the “mother mold”
and go through all of the steps again in order to make another bronze
sculpture.
One of the main things to keep in mind when viewing sculpture is
that the "lost wax" process creates truly unique sculptures.
Although the sculptors examine each of the waxes, and double check
each finished metal, due to the handmade nature of this process,
each cast and each patina will be similar but still distinctively
unique.
|
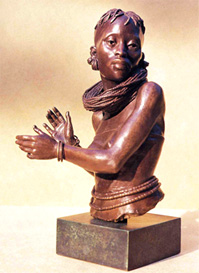
|
Right:
The finished sculpture "Kenyan Dancer" by Sculptor Tuck
Langland. |
|
|
|
|
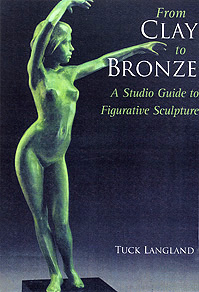
Left:
"From Clay to Bronze: A Studio Guide to Figurative Sculpture"
by Sculptor Tuck Langland. |
|
17.
Summary: The Lost-Wax Process
Volumes have been written on the subject of the "lost-wax"
process as well as the procedures of mold-making, casting, and patinazation.
We hope you have found this overview of the "lost-wax"
process interesting and enlightening.
For further information about the art of the “lost-wax”
process, Sculptureworks recommends the book From Clay to Bronze:
A Studio Guide to Figurative Sculpture (pictured at left) by
Sculptor Tuck Langland,
one of our Sculptureworks artists.
Also, the below diagram from Tuck's book gives a visual summary
of the complex "lost-wax" process.
|
Right:
Diagram by Sculptor Tuck
Langland showing a summary of the “lost-wax” process
(from clay to bronze) with solid, or traditional, investment.
Top row, left to right: the original clay sculpture, the rubber
mold with shell (or "mother mold"), pouring wax into the
mold, the hollow wax cast, and adding the sprue system.
Bottom row, left to right: the wax with investment, burning out
the wax, pouring the bronze, and breaking the cast.
|
|
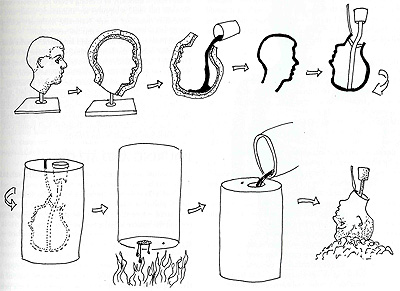
The
above diagram is found in Sculptor Tuck
Langland's book "From Clay to Bronze: A Studio Guide to Figurative
Sculpture".
|
|
The "lost-wax" process explained above is primarily used
for casting sculptures in bronze. Other options, however, for casting
sculpture include bonded bronze, bonded marble, and pewter. Bonded
bronze (AKA "cold-cast" bronze) is primarily resin. The
surface is a skin of resin into which bronze powder has been blended.
Bonded marble is resin with marble powder. With a low-luster white
surface, it is subtle and quite beautiful. Bonded bronze and bonded
marble are hand-cast, hand-finished, lighter-weight and less-expensive
alternatives to bronze. Pewter, an alloy of nickel and silver, is
another less-costly alternative.
Also, if you are interested in creating a sculpture using the "lost-wax"
process, it is important to note that shrinkage will occur in any
casting process. The mold shrinks. The wax shrinks. The metal shrinks.
A sculpture which in clay was 26" long may be 25" long
in metal.
|
|
18. Care for Bronze Sculpture
All bronze sculpture is an investment which must be properly cared
for.
For
indoor bronzes, the bronze should be wiped with a clean, soft rag
once a year. Use a soft brush and apply a coat of Johnson's Paste
Wax or Tree Wax to the sculpture. Allow it to sit for an hour or
so and then buff it with a soft brush or rag. This will protect
your bronze from the oil of human hands, dust, and grease.
Outdoor bronzes should be treated twice a year by cleaning and waxing
the metal. Generally, this cleaning should be performed right before
and right after summer. Waxing the bronze right before summer is
especially important because this will protect it during the hot
summer months.
|
|
|
|
|